Sunday, November 23, 2014

A Pile of Parts


     I'm going to let everyone in on a little secret.  The "Little Trailer Project" blog doesn't exactly coincide with the progress of the little trailer project.  The picture above is a fine illustration of why that is.  While this pile of parts isn't much fun to look at, it did take a fair amount of time and head scratching to produce.  If I had started the blog when I started to put all this stuff together, it would have been a long time before anyone got to see how they would go together, and that would be really boring.  In an attempt to make this pile a bit more interesting, I decided to wait until I could reveal the whole thing at once and maybe convey some idea of how the parts will become a whole.  You might ask, "What is this pile?".  These parts make up the structure of the camper, and are what is required to go ahead with the basic assembly.  In the picture above, in order of foreground to back ground the parts are as follows: roof/fan frame, rear bulkhead, front bulkhead, galley counter and cabinet back, forward cabin cabinet, and aft cabin cabinet.  I suppose it would be possible to begin assembly with just the sides and bulkheads, and build things in as you go.  I prefer to make all of the parts that will  contribute to the strength and squareness of the camper before I begin assembly.  That way I can compare them to each other and make adjustments if there are any discrepancies.    


    This picture shows a the forward (overhead) cabin cabinet parts ready for assembly.  I am using glue and biscuits to join the parts because they will tolerate the stresses of the road better than screws and nails would.  Like the camper sides, all parts must be finished before they are assembled.

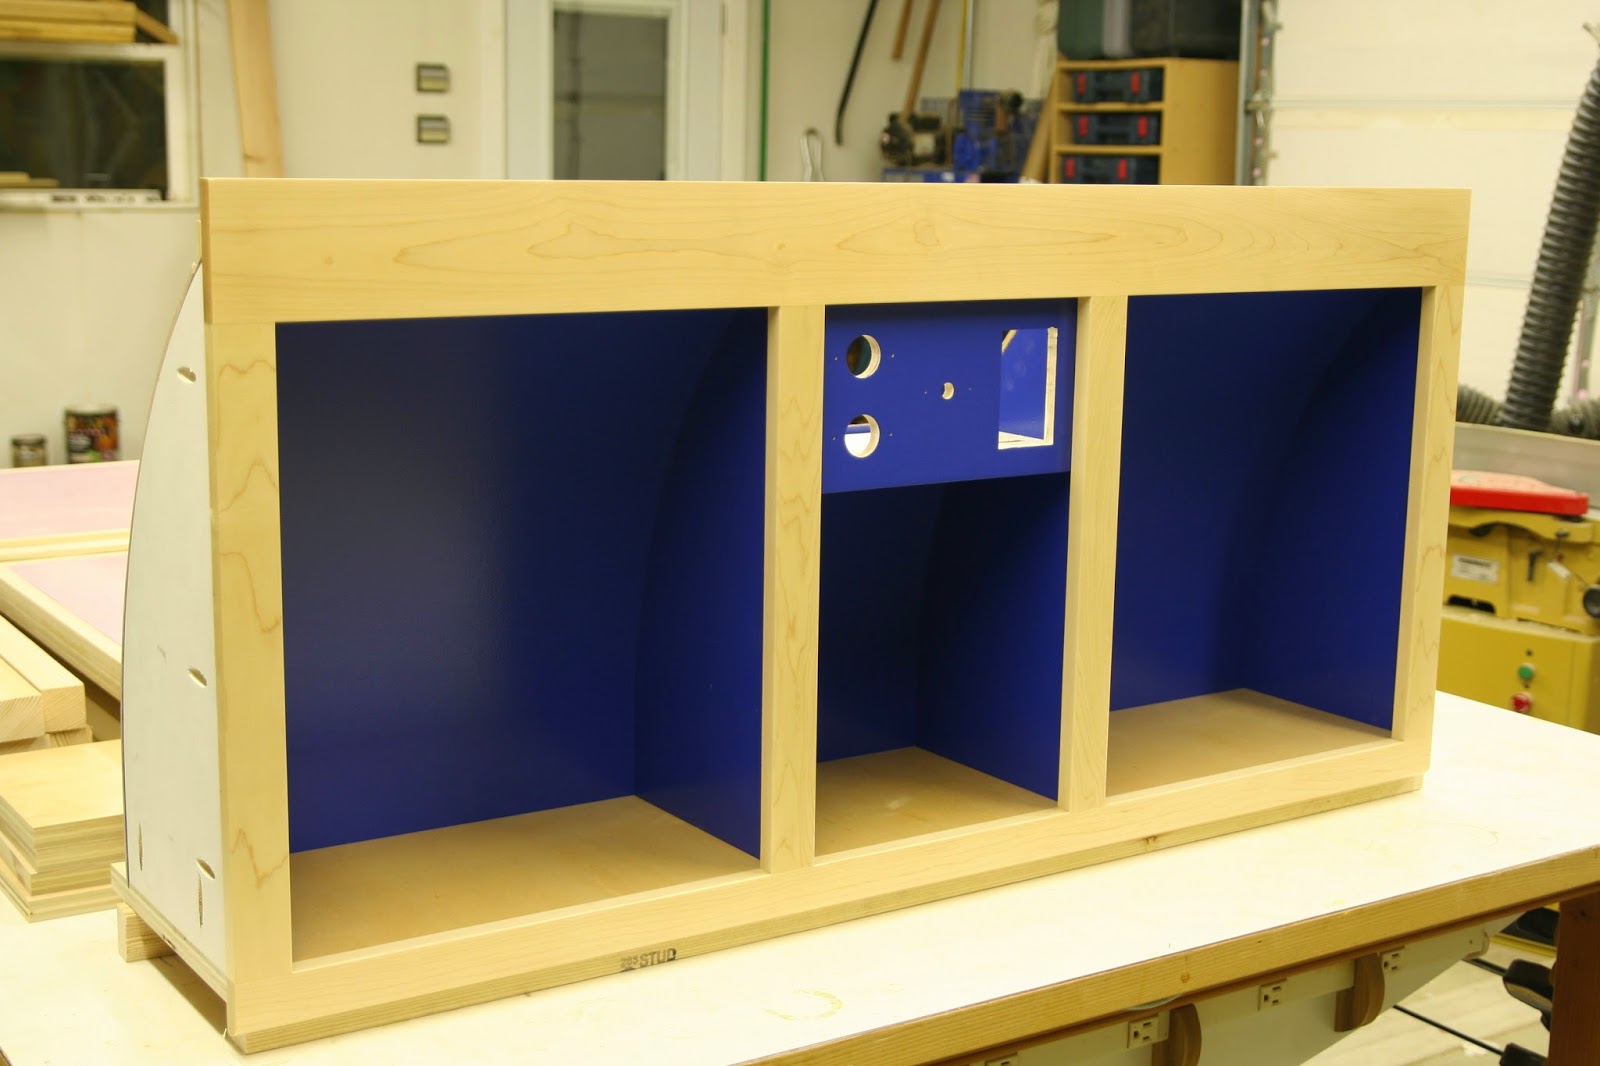
    Here is the  assembled cabinet.  The cabinet back follows the curve of the front of the camper's roof.  Eventually there will be doors flanking the open cubby in the center.  The upper section of the cubby will have a reading light, two 12v outlets, and a 120v outlet.  This cabinet will sit on top of the front bulkhead.


     Spoiler alert!  Don't look at the background of this picture!  I had to dry fit the camper (assemble with no glue and few fasteners) in order to work out the exact dimensions of some parts, particularly the height and angle of this cabinet's profile.  I may have mentioned before how much I love the finishing process.  Because I love it so much and feel it is immoral to indulge in too much guilty pleasure, I use pre-finished maple plywood here and wherever possible.


     This is the aft (over foot) cabin cabinet.  It will share a back with the upper galley cabinet.  If you refer back to the first picture, you can see (hidden by the forward bulkhead, the galley countertop with a dark gray plastic laminate.  It's hard to see, but attached to it's back edge is a vertical piece of plywood.  That plywood will serve as the back for this cabinet, for the galley upper cabinet,  and as the pivot point for the galley hatch.   Now that my basic components are finished and assembled,  I am almost ready to start putting this thing together.  There are still a couple of things to do to get the trailer prepped.


This rubber seal will keep water out of the area of the camper side that will be covered by the wheel well

The cabin flooring has been installed prior to assembly.

     Now we are ready to build a camper!  I fully understand that the anticipation may be too much for some of you to handle, but you're going to have to wait 'til  next time for the big moment.  I promise, next time you'll get to see what this thing is going to look like.

    As we all are getting ready to stuff as much food as possible down our throats and lay around with friends and family in a tryptophan induced stupor watching one football game bleed into the next,  I'd like to briefly remember the Thanksgivings of my youth.  How could this possibly be relevant?  Bear with me and I'll try to explain what is, for me, more than a marginal relevance.   My earliest Thanksgiving memories are of Nanny and Papa's warm and happy home in Gainesville, FL.  My grandmother would cook an amazing quantity and variety of food in a kitchen that couldn't have been more than 10'x12'.  How she did it, I'll never know, but in my recollection, it was effortless and the food was always pure southern perfection.  


     When dinner was winding down and I'd had enough of sitting around the table, I would inevitably find my way to my favorite part of that house; the garage where Papa kept his shop.  He had this wall of tools and gadgets and fasteners and things that I had no idea what they were, and I would just stand there messing with his stuff, trying to figure out what the things did.  If ever I asked him, he would stop whatever he was doing to tell me.  When he was explaining things he used the word "kindly" to mean "sort of" or "like".  I've never heard anyone before or since use that word like that.  He always had a box of scraps and a can of nails that he would let me bang away at.  I spent a lot of time nailing random boards together on the garage floor.  


     This was the place and he was the man that sparked in me the desire to make things.  I always loved it when I saw him get his toolbox because I knew it meant that I would get to "help" him fix or build something.  I was very fortunate to have known his gentleness, patience, and creativity.  It is something that I give thanks for every Thanksgiving, and in fact, much more often than that.  If it weren't for Papa who knows if I'd have built a treehouse or if I'd be building a camper now?  Thank you Nanny and Papa, and Happy Thanksgiving everyone.

Sunday, November 16, 2014

The Shape of Things to Come

     After my last post, one of my readers asked me if I had any "conceptual renderings of the dream".  The short answer was no, but his question did make an interesting point.  Some of you may  not have much of an idea of what it is I'm building, so it probably wouldn't be a bad idea to try to flesh out the vision a bit before going on too much more about building things.  I sat down and made a half-hearted attempt at a sketch of the trailer.  Said attempt was half-hearted because I was feeling lazy and I knew that if I whined about not being able to do it, that my wonderful wife would do it for me.  She did. Thanks, Baby.  Kat's sketch below shows the basic idea for the camper; wooden sides, aluminum top, two wheels, two doors (with a sliding window each), roof vent with fan, cooler and battery on the tongue, and a hatch in the rear that opens to the galley, simple right?  If you want to check out some more detailed pictures of the campers mine will be based on, you can do so  at http://www.bigwoodycampers.com/.  


    The teardrop camper gets its name from it's distinctive profile.  The rounded front and sloping tail make for an attractive and aerodynamic design that gained popularity as early as the 1930's, and that I would argue has yet to be trumped.  Certainly, the bulk of campers on the road today fall pretty short where style is concerned.  The first step toward achieving that retro styling is to draw out and cut my template for the camper sides.  This is where that long awaited sawdust comes in.


Starting with a 1/2" sheet of MDF,  I drew out the shape I wanted (very close to the one supplied by Big Woody Campers).  The biggest visual difference  between my camper and one of theirs will be the shape of the doors.  I wanted my doors to be bigger and rounder.  Theirs have the look of a rectangle with rounded corners.  I like the look of a  continuous curve that blends a bit more subtly into the flat of the bottom of the door.  Once satisfied with the drawing, I used a jigsaw to cut out the outside contour keeping as true to the line as possible.  Some aggressive sanding was required to fine tune the shape making sure to remove all the little wiggles.  It is worth spending some time to perfect the template as any defects will be duplicated exactly on the actual sides.   I used a router on a swing arm to cut the radii for the long curve of the door and for the shorter, tighter one at the bottom, aft corner.  Since the Aluminum trim and weatherstripping to be used on the door require a 1/4" crack, I was able to use a 1/4" bit to cut the door and its opening at the same time.  Now that my templates were made, I was ready to trace them off and cut the real thing.  

The sides will be cut from two sheets of 3/4", veneer core sapele  plywood.  Sapele is similar to mahogany in appearance and is a member of the same family.  I chose it for a couple of reasons; it has a quite beautiful warm color that deepens with the application of a finish.  This darker color will hide the yellow of the polyurethane better than a lighter wood, and it's open and somewhat textured grain should disguise road dirt a bit.


After tracing the templates onto the plywood, the shapes are cut out on the outsides of the lines.

Next, the templates are clamped to the pieces and trimmed using a flush trim router bit.

Ta da! a pair of camper sides.

Here you can see the grain of the wood a little better.

    This method insures that the shape and size of my parts will be identical and that their edges will be uniformly and reliably square.  The next step for these babies is the dreaded finishing process.  I really am not a fan of finishing.  I find it to be a boring, labor intensive, sort of mysterious process that is really easy to foul up.  It is this dislike of finishing that caused me to look for the simplest process possible.  Throughout that search, I ignored all kinds of perfectly good advice from very knowledgable people.  I didn't want to hear anything about 2 step marine finishes or products that take forever to dry.  I settled on Zar exterior polyurethane.  Hopefully it will perform well and I won't wind up kicking myself for not doing something more elaborate.  I did not document the finishing process because, well, there really isn't that much to see, but when I was done I had sprayed the
interior sides with 3 coats of satin and the exterior with 5 coats of gloss.  It is not a perfect finish, but it is pretty good, and it seems to look better to everyone else than it does to me.  The best part about it is that it was done.  Did I mention I'm not a huge fan of finishing?


This picture shows the exterior of the camper side with the finish applied.


Saturday, November 8, 2014

Picking Up Where I Left Off


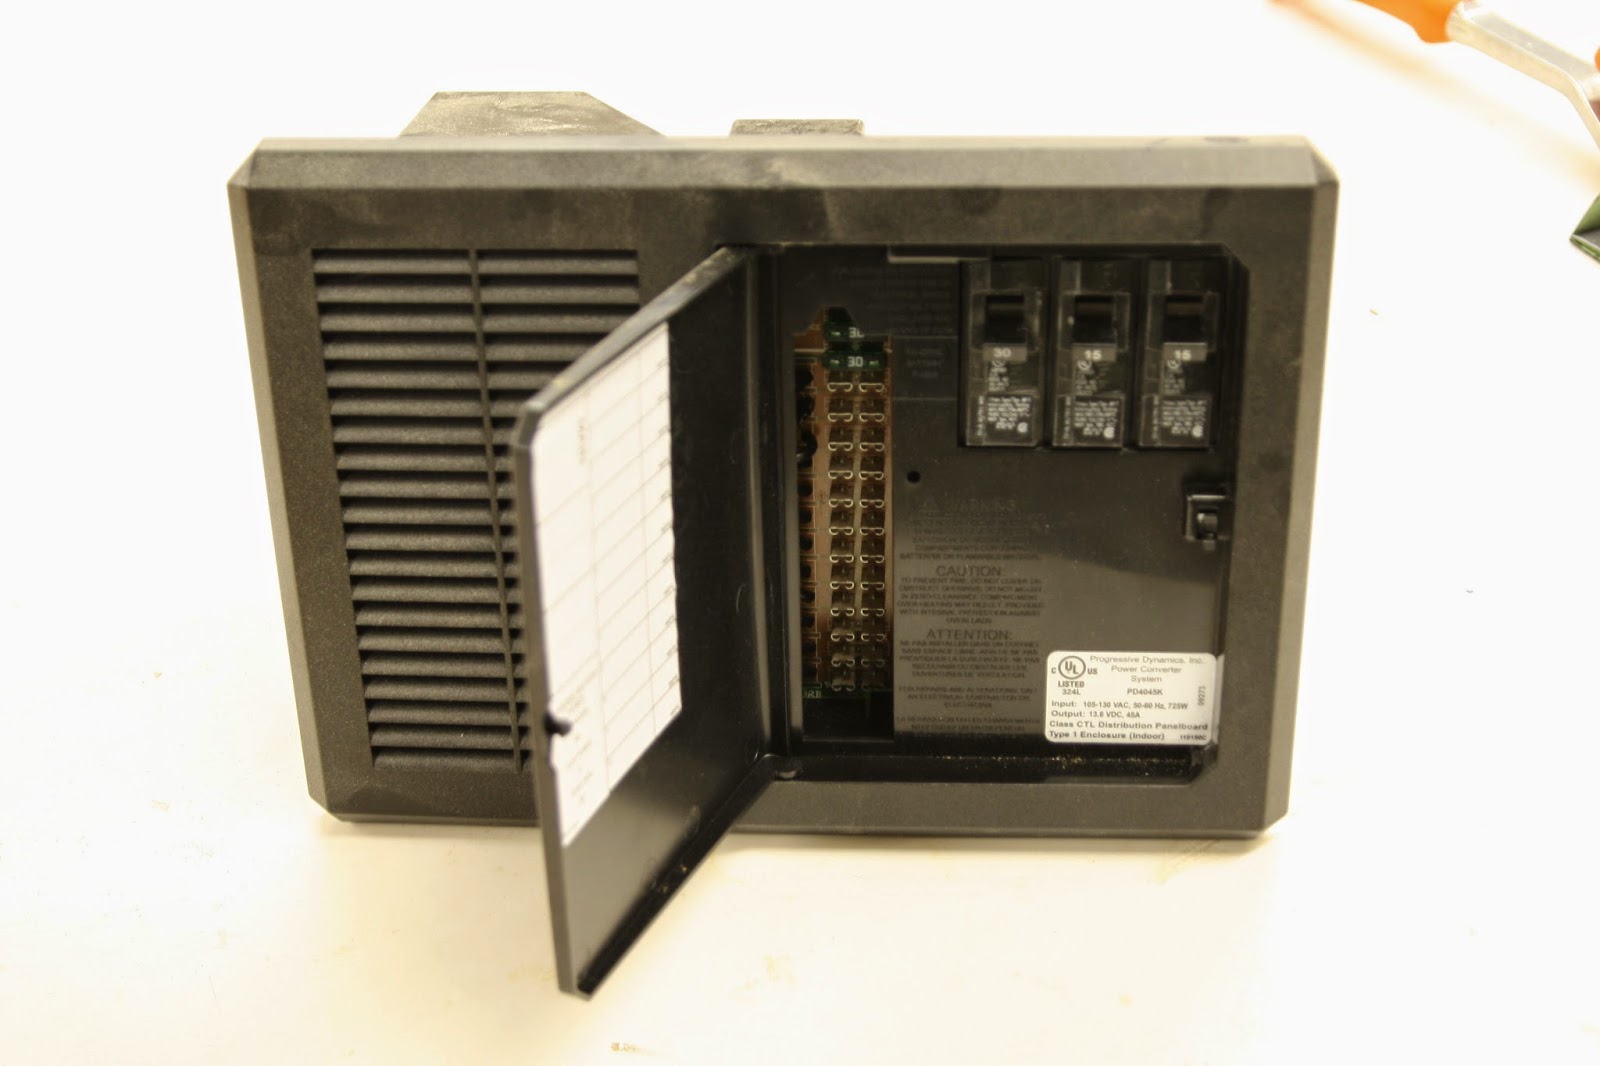
    In my last post, I told the story of how my trailer building efforts were stymied by the intimidating task of making an electrical plan.  Pictured above is a Progressive Dynamics 45 amp converter + AC/DC distribution panel.  The product description for which suggests that if you have this magical box, you really don't have to know anything about electricity because it is a smart box.  Hoping again for very explicit wiring instructions, and, frankly, that I would be miraculously visited by the ghost of electrical understanding, I ordered the thing.  It Came, I puzzled over the hieroglyphics that explain how it works, checked out the innards a bit, and promptly inserted my head in the sand; i.e. went into treehouse mode.  When I came back around to the camper project , I knew that the electrical problem was going to have to be addressed at the start.  The reason it had been such a show stopper in the first place was that I needed to have wires from battery(on the tongue) to the converter and from the converter to the forward section of the sleeping compartment, under the floor, and I needed the floor down before I could build much of anything.  Having gained no electrical knowledge during the lengthy intermission, I decided it was time to force my brother-in-law, Sam, to fix my problem.  Did I mention that Sam makes his living by using electricity and stuff to give fighter pilots the ability  to see through the fuselage of their planes? Really. So, I used my ten year old daughter's slumber party as an excuse to flee, spent a pleasant evening with Sam and family (top shelf brew included),  discussed my mysterious black box over breakfast, and viola....
     
     
     This is the diagram we came up with for the section of the wiring that needs to go under the floor.  It will supply the power to a reading light,  12 volt outlets, a 120 volt outlet (all integrated into the forward cabinet), a 2 way vent fan, and an overhead dome light.  More wiring will be added later to supply power to the galley area.   Some of the details in the sketch below have changed, but it shows the basic shape and locations of the main components of the electrical system. 


     In a particularly boneheaded move, I failed to take pictures of the wires secured to the deck before gluing down the insulation,  but the sequence of pictures below shows the basic layout of the electrical system.

From left to right at the front of the trailer are the battery cables, the 12 volt bundle, and romex for the 120 volt outlet.
You can see the other ends of the 12 and 120 volt wires coming up just behind where the rear bulkhead will be located and just below where the converter box will be.

Detail of the battery cable entering the trailer from below the deck

Here the floor has been glued and screwed down

In this picture you can see the dark grey plastic laminate covering the the floor of the rear of the trailer.  The same laminate will be used to cover the counter top in the galley.  The laminate also marks the division between the sleeping cabin and the galley section.  Clamps where used while the glue set at the rear so that there would not be  screws in the exposed section of the floor.

      While this may not be the most exciting stuff to look at, you can see why it really needed to be resolved before I could move on.  With this step complete, I have officially moved beyond square one and finally have a platform on which I can  start building.  This may be a bit off topic, but I'm going to go ahead and give a little unsolicited marital advice.  "Remember to laugh together", "Never go to bed angry",  "communicate your feelings"; while these little nuggets may contain some truth (as all cliches surely must), I would like to suggest something a little more concrete  and practical.  Marry someone with competent and useful family members.  I say this knowing fully that this is not really actionable advice; you either luck into it or not.  If you do happen to be among the lucky on this score, it is a powerful force multiplier for your spouse's awesomeness, and it often has the happy side effect of allowing you to appear smarter than you really are.  I was fortunate enough to marry into far more competencies than I feel it would be of interest to list here, but I would like to say, thank you, Sam, and I am sure I will be pestering you with more electrical questions very soon.  

     A quick note on saw dust: In the previous post, I promised some sawdust in this one.  Remember that diagram and that sketch at the beginning of the post? ...


Well, I needed to sharpen a pencil for that.
Sorry, I'll try to do better next time.

Monday, November 3, 2014

A Dream Deferred


     Five years ago decided I wanted to build a teardrop camper trailer.  It seemed like it would be a fun project, would be a great addition to the family camping experience, and I just really love that classic teardrop look.  Given my experience as a cabinetmaker, I felt confident that I could handle the basic construction because it really is just a big, funny-shaped cabinet on wheels,  but I was less sure about making the thing water-tight, weather resistant, and roadworthy.  As I poked around on the internet, I came across a company called Big Woody Campers.  I liked the basic look and construction of their camper, so I bought a set of their plans which would serve as a loose guide for my build.  I began drawing plans, making lists, and buying stuff.  
     The foundation of the camper is a Tractor Supply Co. 4'x8' Carry-on utility trailer.  I went out, bought mine, brought it home, under coated and installed the deck, flashed the wheel wells, and coated all the exposed metal with roll-on truck bed liner.  Then I came to the part in my trusty instruction manual that goes like this,"There is no 'set' wiring diagram.  Your needs and creativity will determine the type of power and locations of that power inside your camper. However, if you are unfamiliar with electrical circuits, we recommend that you enlist the aid of someone who is." To say that I am "unfamiliar with electrical circuits", is a bit like saying that my dog doesn't quite understand long division, and I can honestly say that this was one area I felt no need for creativity. This was one of the points on which I had hoped my little book of advice would be be fairly explicit.  I had hoped for exhaustive instruction on wiring choices "A, B, and C" that a small child, a relatively slow one, could easily follow.  It was not to be.  
     I continued to puzzle over the electrical conundrum for awhile, trying to find some way of making a plan without understanding what it was I was trying to do.  Eventually, I got, you might say, distracted by something that seemed to me much easier to wrap my head around; a treehouse.  This is how the dream of building my own camper took a back seat to the dream of building my own treehouse.  Since the treehouse was the reason for such a big detour, I think this is probably a good place for the 50 cent tour.
The large triple-trunk oak in the back yard had the rotting remnants of an old tree fort in it when we  moved in. It was obviously a tree that needed a house.  This is the completed deck that the new treehouse would sit on.

                                               
                                                                   Trial fitting the framed and sheathed walls.

The walls were pre-fabbed in the shop to avoid having to do any siding, trimming,  window installation, or painting once the house was in the tree.

Here you can see the platform on which the house will sit,  the roof panels on the ground, and the rope going up to a pully high in the tree and down to the truck which will provide the muscle for hoisting the wall and roof sections.

One at a time the panels are hoisted and screwed into place.

This is a shot of the treehouse raising crew in the more or less finished house.

Deck railings and stairs would have to wait til Spring.

The treehouse in a particularly sticky snow

Deck railing detail

The treehouse is currently in frequent use as Kat's  painting studio.
     After the treehouse was more or less finished,  there were, of course,  plenty of other things that kept the trailer project from becoming a priority.  The thing that truly brought me back around to it was the simple passage of time.  Kat and I have always talked about taking the girls on a cross country road trip.The idea of exposing our children to the vastness and variety that our country contains is one that means a lot to Kat and me.  Kat has worked with a shocking number of kids who know nothing beyond the borders of their own neighborhoods; who have no concept of city, state, and country, let alone continent.  In my childhood, I was fortunate to be exposed to lots of places and cultures, but it wasn't until I drove cross country with my good friend, Laura, in the summer after my junior year in college, that I felt for the first time, the size and scope  of my country.  Kat and I hope to be able to give our girls the widest view of their world that we possibly can. With Zoe turning 11 in May and Kinsey turning 7 in March it occurred to us that our window of opportunity is narrow.  We have decided that 11 years old is pushing it for the age of a child who would be willing to spend their entire summer traveling with their parents, and that 7 is the age we remember Zoe becoming a pleasant and reasonable human being, so , by extension, we hope Kinsey might, at the same age, be tolerable in close quarters for six weeks.  At any rate, the summer of 2015 seemed to be the best opportunity to make it happen.  All of this amounts to a deadline, which may be just what a  dream needs in order to become a reality.  Now that the backstory is filled in,  I can get to making some sawdust in the next post.