Tuesday, December 23, 2014

A Visit from "The Little Trailer Project" 's Electrical Engineer

    During the planning and layout phases of the camper's electrical system, I turned to my brother-in-law, Sam to lend a much needed hand.  As I have mentioned before, my understanding of such things is limited (generous description).  Early in the planning process, I visited Sam and family and we put together a wiring plan and parts list for much of the system.  Later when I was ready to close up the deck, they all came out to oversee the installation of the wires that would be covered by the camper floor.  While it may not rank among the most noteworthy achievements on Sam's resume, it is clear that he has become, whether he likes it or not, the chief electrical engineer for "The Little Trailer Project".  So, naturally, when the time came to take the next step in installing the electrical system,  I once again called on Sam to supervise.  This past weekend, he and his boys came out,  we spent the day in the garage, had a few tasty beers, and made some good progress.


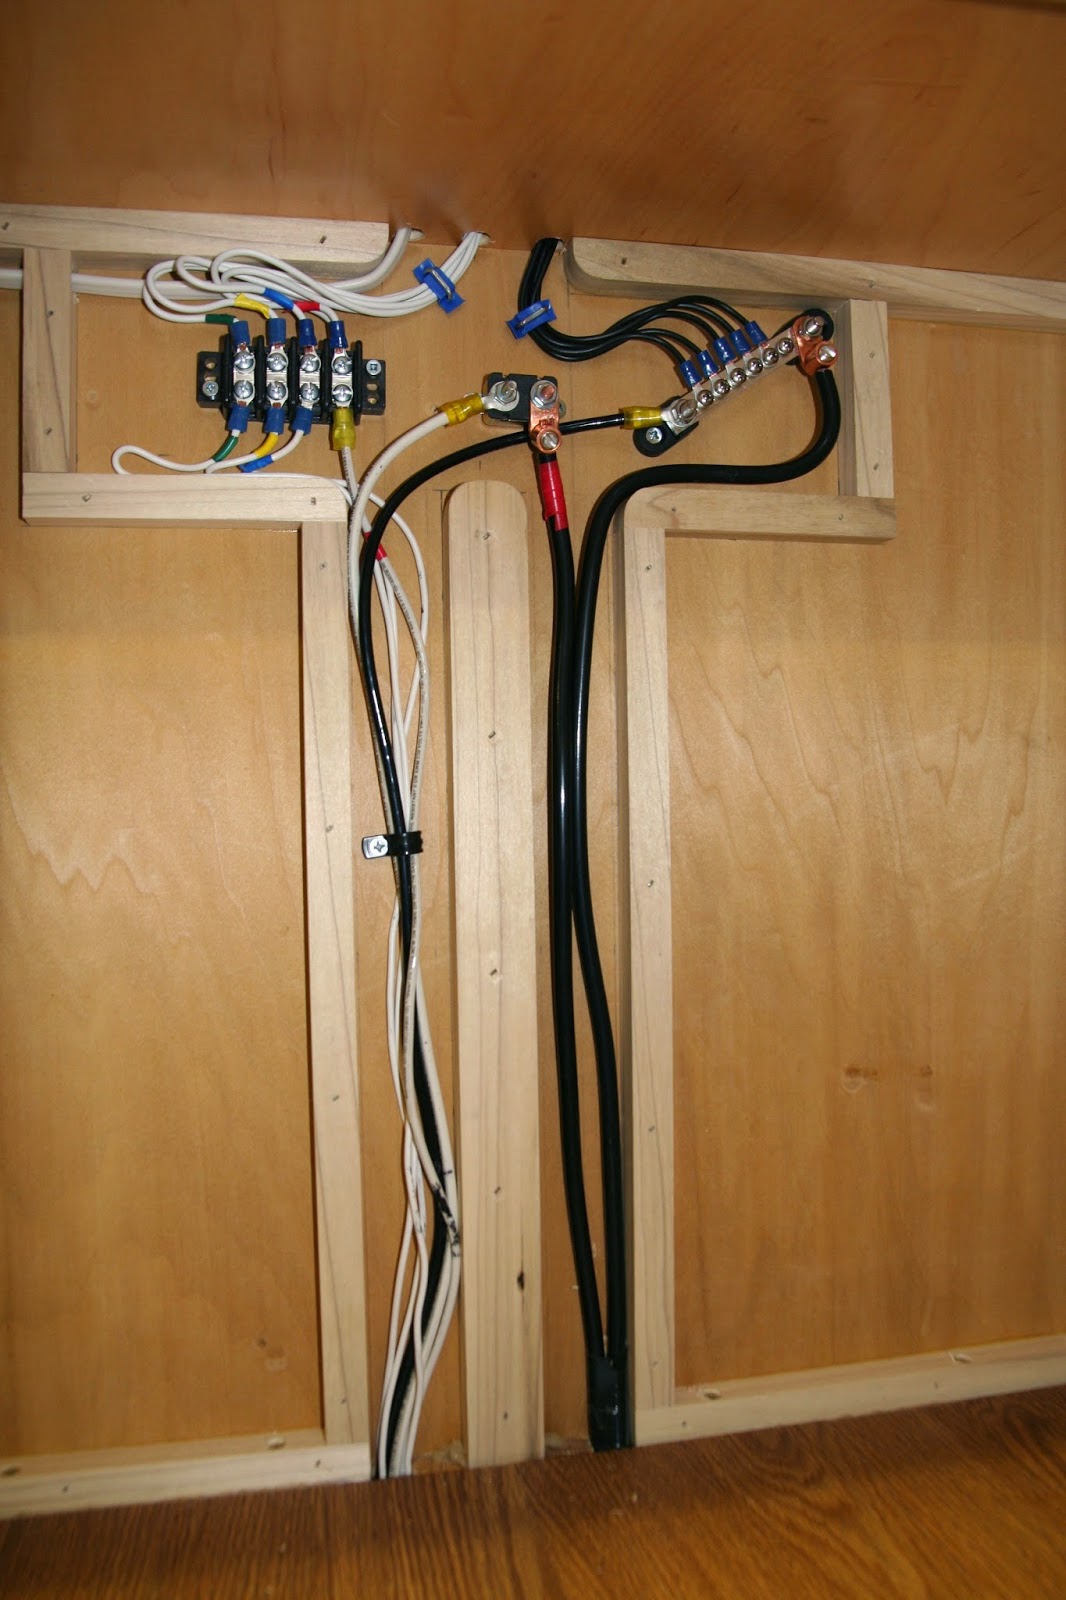
     The diagram above shows the wiring plan for all of the electrics forward of the rear bulkhead which houses the inverter/ charger/ fuse box.  There will be a second part to the wiring scheme that will feed the galley and exterior lights.  The reason for breaking it up this way is that everything to the front of the rear bulkhead needs to be fed by wires that are buried in the floor.  The wires for the rear half will be routed through the galley cabinets.  The picture below shows the interior of the forward bulkhead all wired up.  The top section is the junction box that is depicted by the large center box in the diagram.  The cables coming up on the right come from the battery that will be mounted on the trailer tongue.  The wires coming up the left side run under the floor and back to the main box.


These circuits will supply power to a pair of 12v outlets, a reading light, a dome light, a ventilation fan, and a 120v outlet.

     In the picture above you can see the back of the forward overhead cabinet.  The picture below shows the front of the center panel of the same cabinet.  The wires that you can see going through and into the roof section will feed the roof vent fan and overhead dome light.


The picture above shows the front of the magical electricity box that changes the currents into the right kind and keeps them organized and separated so they do not argue.  It also keeps an eye on the battery charging so that it stays sort of Goldilocks.  I apologize if I am being too technical for some readers here, but it can be difficult to discuss matters of electrical circuitry in lay terms.  Below is the back of said magic box where all of the connections are made.  It is pretty difficult to see in the photo, but coming through the side wall is the 120 AC inlet and coming up through the floor, just behind the rear bulkhead, are the DC bundle and the AC line that run under the floor to the front of the camper.  The front opens into the sleeping compartment at the sleeper's feet, and the back is accessible inside the lower galley cabinet.


     After all the connections were made it was time to see if it works.  The picture above shows the 120 AC power inlet.  We plugged it in, Sam did a few checky-type things with his volty-meter on the main breakers, we flipped the switch, and, as you can see in the picture below, the light came on.  WooHoo!  I played it of cool, but I was pretty psyched.  We tested the 120 and 12 volt outlets and all were good.  Next we pulled the battery out of my truck, hooked it up to the leads with jumper cables, and repeated the test; everything worked perfectly.


     Now that everything that can be installed to this point is in, tested, and working, there are just a couple more things to do to bring this step to a close.  

Foam insulation is cut to fit into the voids in the front bulkhead and glued in place.

Next, 1/4" maple plywood finishes off the cabin interior.


     I've had these electrical components kicking around in my shop for so long now that it is a bit surprising to see them take their rightful places.  I think part of the surprise is due to the fact that all of this is still, albeit a bit less, something of a mystery to me.  I cannot thank Sam enough for taking the time to walk me through this particular aspect of the build.  We have been talking a bit about some solar panels, maybe an inverter for the truck, so future episodes of "The Electrical Engineer" may be in the cards.

Thursday, December 11, 2014

Baby Steps

      Some updates on the trailer project will be more dramatic and show more progress than others.  This one is going to be more incremental in nature.  My last post showed the culmination of a backlog of work finally coming together, and had a satisfying "Tadaaa" effect.  Since then I have done a fair amount of head scratching and standing around in the shop staring or squinting at various unresolved parts of the camper.  These musings have yielded the start of some work on components that will require significant lead time before they are ready to install.  That said I have managed to make a bit of visual progress that I can go ahead and share.


     The above picture shows various spars (frame members that bridge side to side), the roof frame that will house the ventilation fan, and the protective aluminum strips that will line the door openings.  You may notice that the two spars laying on top of the fan frame are cut at angles.  These are the spars that will be attached to the tops of the cabinets in the sleeping compartment, and the angles correspond to the curvature of the roofline.  The aluminum strips have been cut to length, had holes drilled and countersunk for #4 screws 4" on center, and scrubbed clean with scotch brite.


This picture shows the exposed and vulnerable edge of the plywood.  Though it has been sufficiently coated with polyurethane, I thought it best to go ahead and protect those fragile corners from accidental dings before doing too much crawling in and out.
The aluminum lining installed


The spars and frame have been glued and screwed in place.  One has been left out so it will not be in the way of wiring the outlets in the forward cabinet. 


     While these are not huge steps, each new part gives the camper an added measure of solidity and brings the overall shape just a bit more into focus.  For me, the way something reveals itself to you as you build it, may be the best part.  You have a picture in your mind of what you think you will make, but as you begin to coax it into existence, it tends to have it's own ideas.  In the vein of revelation, something occurred to me recently as I finished the evening bedtime story ritual and put the girls to bed.  I am reading "The Wonderful Wizard of Oz" to my 6 year old and "Watership Down" to my 10 year old.  On this particular night Dorothy and her friends narrowly escaped being devoured by a pair of Kalidas and Bigwig was caught in a snare.  What occurred to me was this: both of these stories are about journeys and both are full of anxiety and peril.  Although I love both of these stories,  they may not be the best primer for a child's real life journey.  So, If any of you out there have a favorite journey or travel related story appropriate for a 6 or 10 year old, let me know and I'll put it on the list.


Tuesday, December 2, 2014

Getting Somewhere


     I have, as a possibly odd idiosyncrasy of my personality an innate reluctance to give voice to any plans  that are less than roughly 75% formed in my mind or that are unlikely to come to fruition.  I often avoid mentioning trips or events that I know my kids will be excited about until the arrangements are made and I know we can make it work.  I can't stand to have anyone reading something I'm writing over my shoulder, even if it's a silly comment on Facebook and the over-the-shoulder reader is my six year old daughter.  Given this bit of neuroses, it may seem strange that I have decided to write a blog about building something I have never built before with the ultimate goal using it to take my family to the far coast of the country and back.  I think it is strange, but it may not be.  I have talked to my wife and kids about this trip a lot.  We have a large USA map on or dining room wall which we reference during discussions of possible routes and people and places we may visit. One of  Zoe's most recent bedtime books was Steinbeck's "Travels With Charley", his account of driving cross country with his dog.  I've talked about the "plan" to many family and friends, and made a very public declaration of intent: "The Little Trailer Project".  All of this makes me somewhat uneasy, but I think I deviated so wildly from my usual M.O. simply because the thing felt too complicated a concept to see my way through to the end.  I think I may have allowed myself to talk about it as a way to make it seem more real, more achievable.  In some way it has amplified the consequences of failure.  Maybe all of this will help me to avoid getting bogged down in the details, and, in the  immortal words of Dory the fish, "Just keep swimming."  Pontification over.  Time to build.


     In my last post I discussed making parts, preparing the trailer for assembly, and dry fitting the basic camper.  The dry fit was done prior to the application of the wheel well seal seen in the picture above on the right  because positioning the sides requires standing them on the trailer deck next to the 2" insulated floor.  This is easy without the seal, but the tightness of the compressed seal makes the task much more difficult.  I only wanted to do it once.  While I would have Kat there to help me, it was this particular task, which needed to be performed twice within the open time of a fair amount of glue, that prompted me to call in reinforcements.

Longtime friend, amazing artist, and favorite weirdo, Joe.

   With my helpers in the shop and a few tubes of construction adhesive locked and loaded we were ready to go.  The next set of pictures will seem like a bit of a jump, but that is because quite a few things needed to happen at once during the side installation.  All hands were needed to get things in the right place as quickly as possible.  First we ran a bead of glue down the edges of the floor and on the deck of the trailer where the camper sides would sit.  The bottom of the wheel well seal was strapped tight with a strap clamp to prevent it from getting pushed down as we wedged the sides in.  Once both sides were in, they were held apart while the forward bulkhead was glued and clamped into position.  After a few final adjustments we screwed everything in place.

Sides up with forward bulkhead clamped in place

In one door and out the other

Inside of front bulkhead 


The screws are countersunk into the floor stringers roughly every 4", and will eventually be covered with a wood trim.


     The next pieces are the rear bulkhead and the galley countertop and cabinet back assembly.   The bulkhead will support the countertop and together with the galley cabinet back will insure the squareness of the camper sides.  A cleat is glued and screwed to the galley floor inside what will become the galley cabinet.  Next the sides are forced apart and the rear bulkhead, already outfitted with side cleats is glued and screwed in place.  The countertop is placed on top of the bulkhead and support cleats attached to the sides and secured with screws.  The top of the cabinet back is checked  for squareness to the countertop and clamped into position.

Here you can see the floor cleat to which the bulkhead will be attached and the countertop support cleats.

Kat holding the sides apart to make space for the bulkhead
Countertop and cabinet back assembly going in

      Last to go  in are the forward and aft sleeping cabin cabinets.  Surely you get the idea by now; glue and screws.  The cabinets are really no different.  The real challenge with the cabinets is getting them in to place without smearing glue all over the inside of the camper walls.


In this picture you can see the forward cabinet on it's back on the floor and the aft cabinet to the right.

Typically, glue does not make me this happy, but my wife was dorking it up behind the camera.


As you can see, the forward cabinet is really heavy.  Luckily, Joe is pretty beastly.

Drilling holes for wires to run behind the cabinet back

Front cabinet installed


Aft cabinet installed

     It was a fun day.  To this point I had been spending quite a lot of time putting things together and it didn't seem like I had all that much to show for it.  Now I have something that is beginning to like like an actual teardrop camper, and it's not coming apart.  It always seems to me that the toughest part of any building project is the beginning; the imagining something that doesn't yet exist, the speculative part.  Once I have a cabinet, or a piece of furniture, or a whatever begin to take shape in front of me, things get a little easier, the questions a bit more specific.  There's still a lot of head scratching to do, and tons of sawdust to make, but this feels like a bigger step than all those that came before it.